September 13, 2012 by akhilendra
How to Set Your Google Adwords Campaign?
If you have recently launched your blog or website, then you might be looking at the ways of generating traffic for it or you have been in the business for a while but still not getting desired traffic.
Traffic is the key.
As you might be aware that traffic can be generated though;
- Search engine optimization
- Social media marketing
- Email Marketing
- Paid advertising campaigns like PPC, Banner advertising etc.
If you are new then it will take some time build upon seo and smm so you may consider using Google Adwords to manage your pay per click campaigns to get traffic.
There are lots of people who don’t consider it good and complain about the low conversion rate but looking at the fact that your blog is new, it is one of the most reliable and trusted way of generating traffic.
Google Adwords campaigns are extremely helpful for small businesses. In fact, they could be the perfect advertising solution for acquiring new customers for small business entities.
Google adwords is like an additional supplement for your promotional requirements.
But again, it is like any other tool. You have to use it in the best possible way to get the best out of it.
It is best because it allows you to configure everything. So, let’s see how you can set your Google Adwords Account and campaign.
- 1. Sign Up
First sign up at https://accounts.google.com
If you are already using Google’s other services then you can use your existing id and password to login.
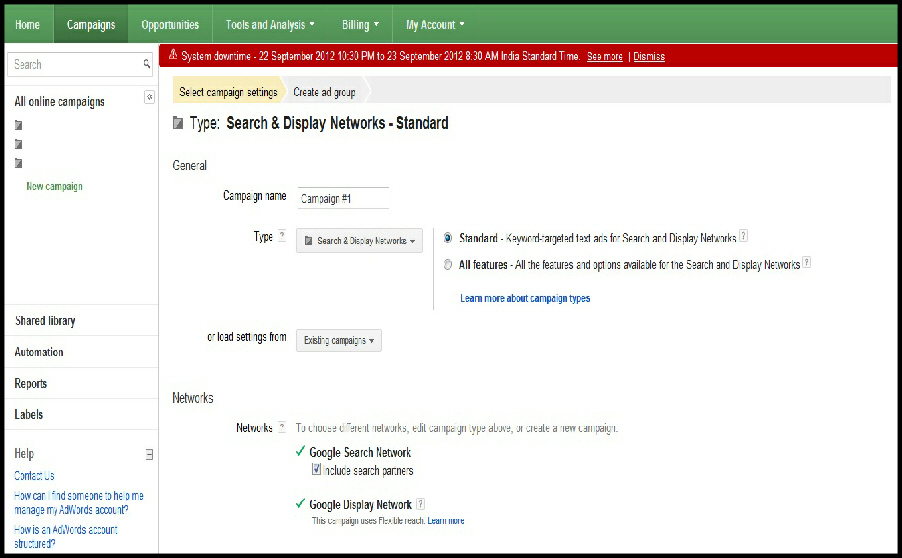
- After login, click on the “Campaigns” in the top menu.
- Then click on Create a New Campaign, it will ask you to select the desired campaign type from three options;
- Search and Display Network
- Search Network Only
- Display Network Only
For the purpose of this post, we are going to create a ‘Search and Display Network’ campaign because it will cover all details. If you want you can select any other campaign type which suits your need.
- 4. Campaign Settings
In campaign settings, you are going to configure your campaigns which will drive your business. So if you make any mistake here, it will have direct impact on your campaign’s performance.
Let’s look at the various component of it.
General Option
First you need to give it a campaign name.
It is the name of your campaign and will be displayed in your admin dashboard. So select name through which you can easily identify it.
Campaign Type
Then you need to specify the campaign type which will be prefilled with the selection you made in step 1 which in our case is “Search and Display Network”.
There are two options in “Search and display Network” campaigns,
- Standard
- All features
Standard is the basic version of your campaign in which you will not get few advanced options like;
- Product ad extensions
- Demographic and social settings
- Ad scheduling
And few more features.
To know more about it , visit https://support.google.com/adwords/bin/answer.py?hl=en-GB&answer=2567043
To begin with, you can select all features option.
Networks
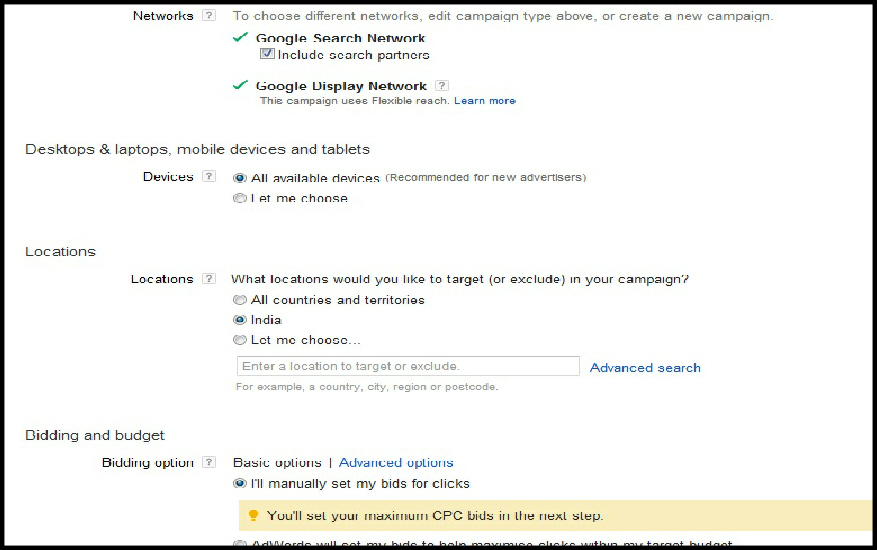
As you know Google’s product are widely used by webmasters across world. So Google has got a wide network. This section is related to that. You can specify this information there. You will get options;
Google Search Network – It includes their different Google search sites like Google US, Google India and many more.
Google Display Network- Google Display Network involves Google Partner site’s like Youtube.
You can select both of them or specify based upon your targeted customers.
Devices
You can target the desired device here like desktops, laptops, mobile devices and tablets. To begin with, you can select all unless until your products are specific to any one.
Locations
This is very important. You cannot select all countries to target.
If you do so, your ads will be displayed everywhere and as a result your expenses will go up significantly with most of the money going in vein.
So specify the countries here.
Even if you are selling online goods which can be sold anywhere and everywhere like E-books, software etc, you should carefully select countries which you think will be perform better in terms of sale for your products.
Bidding and budget
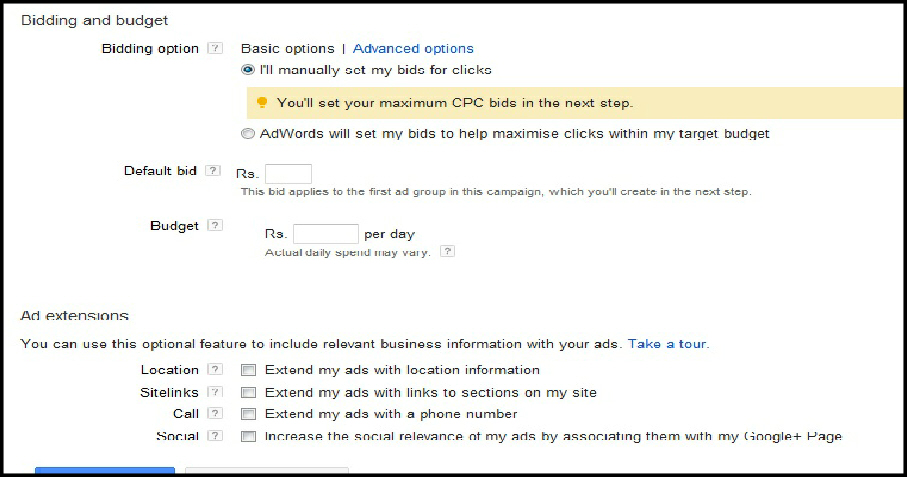
This is the section where you specify the bidding option, amount and total daily budget.
Under bidding option, you will get three options (radio buttons).
- First is bidding option where you can either select the manual bidding option or automatic option where adwords automatically decide your bidding amount based upon your targeted keywords and locations.
- Default bid
- Daily budget where you can specify the daily budget.
Ad Extensions
This is a very good feature offered by Google Adwords. You can use it improve your ads and campaign. Google offer variety of Ad Extensions. It consists of;
Location- you can use address in this so if you are using Google Adwords to promote your store or shop, you can add your address here which will be displayed in ads. It provides extra edge to your campaign.
Products– if you have a Google Merchant account then only you can use it. If you have, then you can integrate your product details into your ads in Google Search, Image Search and Product Search. It is a very good method of adding additional punch to your ads.
Sitelinks – this is a very good option for internet marketers who are promoting one url (landing page) but have multiple urls (related pages) which deals with the same topic, so you can include them also in your campaign.
Call – You can use it to add your phone number directly in your ads so that customers can call you directly. It can be used through smart phones like Android or iPhone.
Social – You can add Google+ in your ads by using this extension. But before you use it, you have to link your google+ page to your site.
Mobile App– This is very good option for those advertisers who are also looking means to promote their apps. You can add a link below your ad pointing towards any Android Market or Apple App Store.
These extensions are extremely helpful and it is imperative you use them. Most of us don’t need all of them but use which is applicable for you.
After adding your ad extensions, you can specify other settings like;
- Schedule– Start date, end date, ad scheduling
- Ad delivery– Ad rotation, frequency capping
- Social settings
- Keyword matching options
- Tracking URL for dynamic links
Leave them if you are not sure about these settings.
Once you are done with these settings, you will have to create your ad, select keywords and placements.
Ad creation
First you have to create a Text ad for your campaign. You can and you should only use limited words in your ad so try to put your best foot forward.
Convey the message in the best possible way. As it is custom for every blog or website, think about it yourself.
You can also create banner ads using Google Ad creator.
Keywords
This is one of the most important and critical part of your ad campaign. You have to select keywords which are most relevant to your products and services.
There could be thousands of keywords applicable to niche but you need to select only those which are closest to your business.
For example: You are promoting a restaurant which is serving Italian and Thai Cuisine. As you know that there could be variety of keywords which can be used for promoting a restaurant.
But as you restaurant is serving only Italian and Thai dishes, you should select appropriate keywords to target those customers who are looking for these cuisines rather targeting anybody who is looking out for food.
If you use generic keywords then your expenses will go up and conversion rate would be too low.
In fact, most of the marketers who complain about lower conversion rate with Google Adwords face lower conversion because of the inappropriate keyword selection.
Google adwords provide you a keyword research tool to search for keywords which are used by the people to find things related to your product and services. You should use this keyword tool to find appropriate keywords.
Placements
You can use this to place your ad on a specific site of your choice.
For example, if you find our site is relevant to your product or niche & you decide to advertise on this, you can simply enter the url of this site or any other site in the placement box.
It is very good tool if you want to advertise on your competitor’s site or any other site of your choice.
Once you are through these steps, your campaign is ready and your ad is ready to be displayed.
But you need to make sure that your campaign is enabled.
Now you can also create banner and Image ads.
You can either upload your image in Google Adwords or use Google Adword Ad builder to create your banners. It comes with few templates and if they suite your need and preference level. You can use it create banners of all sizes.
Banner ads are good in grabbing attention so you must use them.
Targeting is the key when it comes to pay per click campaigns.
If you are starting a blog with no specific requirement of pay per clicks ads, then I will suggest you to invest in getting some good tools and plugins rather than putting your money in adwords or any other pay per click program.
Google Adwords is best for small businesses.
If you think otherwise or have questions, please leave your comments.


ppcprofessionals.com/adwords-101/keyword-research/match-types">Dustin - March 26, 2013 @ 6:41 pm
One other thing to mention is that the match types for your keywords is pretty important. You definitely don’t want to make the newbie mistake of using all Broad Match keywords if you’re new to Adwords. Thanks to the introduction of Broad Match Modified keywords in mid 2012 you can use them instead of broad match keywords and really reduce the number of useless clicks you might receive otherwise. Also using negative keywords is another great way to do this.