March 20, 2013 by akhilendra
WordPress CDN-Setup MaxCDN & Cloudflare with W3 Total Cache

Page speed is one of the most important factors in search engine rankings. Also, better page speed mean better user experience which results in reduced bounce rate, better page views and more business.
Have you ever run any page speed test for your site or blog?
If no, then you can use these free tools to run speed test for your site;
Managing page speed is often not on radar for bloggers and they tend to spend more time on other search engine optimization stuff.
Page speed is crucial because if your blog is loading slowly then irrespective of the quality of your blog or its design, visitors are going to leave your blog. Nobody likes to wait for anything in today’s world and waiting for a site to load is not an exception.
Page speed depends upon lots of factors like;
- Location of your server is one of the most important factors which influence your blog’s page speed. So it might be working fine for you but it may not work for your users coming from a particular location.
- Page factors have a high impact on your page speed, some of the examples of these page factors are number of external javascripts, html & css details, images, tags, database queries and many more factors.
You don’t have to learn about these factors or their technical details. Idea is to inform you about number of things which can influence your page speed.
You need to take measures to enhance your users experience and search engine rankings by controlling your page speed. Better page speed always contributes positively to your business.
Utilization of CDN or Content Delivery Network is one of best method to improve your page speed.
CDNs are economical, easy to implement with W3 Total plugin and provide great results.
What is CDN?
In short, CDN or content delivery network is network of servers which serve cached content to your visitors from a location which is closer to their location, thereby increasing your blog’s page speed. It functons by;
1. Serving cached content- caching is one of the primary methods to manage your page factors which influence your page speed.
2. Bringing your visitors closer to your blog by using a server which is closer to their location, for example, if your site is hosted in USA and you have a visitor in Europe, without CDN, your blog will be served from servers located in USA, which will increase the load time whereas with CDN, your content is served from a server which is located within Europe and close to the actual location of user. Therefore it increases the page speed and reduces the load time.
There are many Companies providing CDN services. Good CDN companies will have servers spread across entire globe so they can cover all geographical locations.
WordPress CDN
WordPress CDN is essential for your blog because of the five reasons;
- Improved page speed
- CDN help in handling increased or unexpected traffic rise by serving content from servers located in different locations. If you are not using CDN then your blog may not handle a sudden increase in traffic and may crash. So by using CDN, you ensure that your blog promotion activity doesn’t go in vain.
- Improved user experience
- Improved SEO
- Improved conversions
So, Should You Use a CDN? Ask yourself.
WordPress blog depends heavely on plugins to add additional functionality to your blog. These plugins take a toll on the page speed. By using CDN, you can mitigate that risk and provide better user experience.
WordPress free themes are also not coded very well so they also interfere with the page load time. You should try to use wordpress premium themes along with CDN to enhance the user experience of your blog.
Maxcdn is the best wordpress cdn. It is best because;
- It is extremely easy to install and setup maxcdn with W3 Total Cache Plugin in wordpress.
- It is the most economical wordpress cdn for bloggers.
You should use maxcdn with cloudflare to further boost your user experience, security and cost viability of your wordpress CDN.
What is MAXCDN?
Maxcdn is a content delivery network which can be used for any content management system like wordpress, joomla, vbulletin and other CMSs.
Maxcdn provide a global network of servers which server the cached content of your site, thereby increasing the page speed.
I have referred to it as wordpress cdn because I am using wordpress and this post is primarily about implementing maxcdn into wordpress blog but your can use it for any other CMS.
Maxcdn provide CDN services for any kind of site or content like text, videos or any other kind of files.
It is cost effective and they charge 1 tb of content delivery in $39 only. This package is enough for most of the bloggers and small businesses. They also offer other packages for bigger sites but that is required for bigger sites. You can choose a package based upon your requirement. Discount coupon for Maxcdn = akhilendramaxcdn
Maxcdn is used by some of the biggest websites in the world so you don’t have to bother about their quality of services, it is well known in CDN industry.
What is Cloudflare?
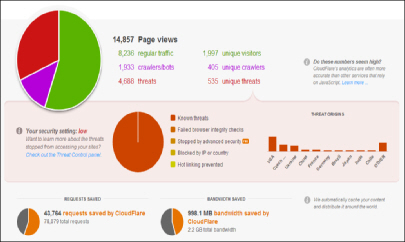
Cloudflare is not a exact content delivery network but they offer similar services. Your visitors are routed through a secure network of cloudflare which optimizes your content for better experience and provide security from malicious attacks.
Technical speaking, cloudflare is a caching reverse proxy. But you don’t need to bother about it’s meaning if you can’t understand it.
In simple words, cloudflare will save your bandwidth, optimize content and provide security to your blog. Cloudflare is free so you should use them even if you are not using maxcdn or any other content delivery network.
One of the best features of cloudflare is that they will continue to serve cached content to your visitors even if your hosting service is down.
As mentioned earlier, cloudflare is a independent products and on its own, it is quite efficient. So no matter what, you must use it.
You can sign up with cloudflare, they will give you nameserver details upon sign up which you will have to update in your DNS records with your domain registrars.
If you are using hostgator or Godaddy, then it is fairly easy to add that. Leave your comment if you need information on that.
If you are using any other web host, then you can contact your support to get more information on that. But it is fairly easy. You just have to enter values given to you in the nameservers field in your domain registrar accounts.
Why use Cloudflare with Maxcdn?
As mentioned earlier, that cloudflare is self sufficient but that’s not the only reason you should be using it.
Cloudflare reduces the amount of bandwidth and data delivered by maxcdn which help you in staying below that 1 tb limit of the starter package in maxcdn.
Cloudflare
So if your traffic really goes up and the amount of content delivered through maxcdn crosses 1 tb, you will have to pay them extra bucks whereas by using cloudflare you can reduce the overall amount of data, thus save good amount of money by using them along with maxcdn.
Now you will see how to install and setup maxcdn with cloudflare using W3 Total Cache plugin in wordpress.
WordPress CDN Implementation- Phase #1
Step 1 – Sign up at MAXCDN and Cloudflare.
Step 2– Update your nameserver details with the nameserver given by cloudflare.
Step 3 – login to maxcdn and click on create Pull Zone.
Step 4– Now you need to enter detail in the form shown to you, details are;
Pull Zone Name – Name your pull zone, it could be any like name of your blog or site.
Origin Server URL – enter complete url of your site including http in the beginning and / in the end.
Custom cdn domain – example is; cdn.yourdomainname.com , you can put your domain’s name in yourdomainname portion. For multiple custom cdn name, you should select cdn2, cdn3 etc.
Label – you can select any label for your pull zone.
Check the checkbox against compression.
Once you enter the fields mentioned above and click on create, your pull zone is created. It will give you a long url with your domain’s url in it. It will ask you to create cname for this URL.
Create CNAME for Maxcdn without cloudflare – now you need to create cname records for the url given to you by maxcdn.
For hostgator or other host providing cpanel, you can create cname using the Simple DNS Zone Editor in your control panel. Login to your control panel, navigate to section with heading Domains. Under domain, click on simple DNS Zone editor. Within that, you will fields to create cname as shown in figure.
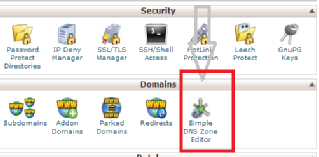
simple DNS zone editor in cpanel
create cname in cpanel
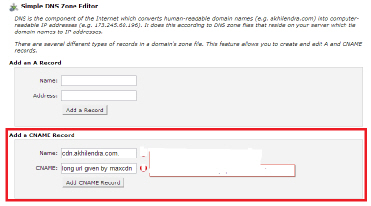
You should create multiple cname for optimum performance. There are two values which you need to provide.
Name – this is the name of your cname custom url. Enter cdn in it. As mentioned earlier, you should create multiple cname for optimum performance. For first, it should be CDN, for second it should be CDN2, then CDN3, CDN4 and so on. You only need to enter cdn, cdn2,cdn3 and cdn4 in this field and not cdn.yourdomainname.com.
CNAME – this is that long url which is provided to you by maxcdn. You can find that in maxcdn admin dashboard in ‘manage pull zone’. It will remain same for all the name (cdn,cdn2) mentioned above.
If you are not sure about how to create cname with your host, then leave comment or contact your host support.
Create CNAME for maxcdn with cloudflare– if you are using cloudflare with maxcdn, then you need to create cname in your admin dashboard of cloudflare. It is fairly easy. Simply login to cloudflare account, click on DNS setting and under DNS setting, create cname using the fields as shown in this image.
Once you create cname, you are ready to implement maxcdn in wordpress.
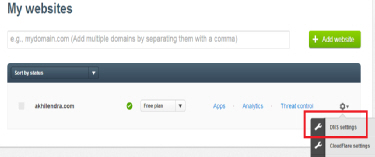
cloudflare dns settings
create cname in cloudflare
Now you need to go to your wordpress admin dashboard.
Install & Setup maxcdn and Cloudflare with W3 Total Cache- Phase #2
You can install w3 total cache plugin in wordpress by using the conventional process of searching and installing plugin in wordpress.
W3 Total cache plugin has been recently updated, so these steps are to install and setup maxcdn and cloudflare with latest version of w3 total cache plugin which is different from the older version.
Once you have installed and activated w3 total cache plugin, it will add ‘Performance’ menu item in your admin dashboard (left hand side below settings).
Implementing Cloudflare in W3 Total Cache
Step 1 — navigate to General settings tab in Performance.
Step 2 — find and navigate to “Network Performance and security powered by cloudflare”.
Step 3 — Enter API and other details in the section. You will find API details in cloudflare admin dashboard and click on Save button.
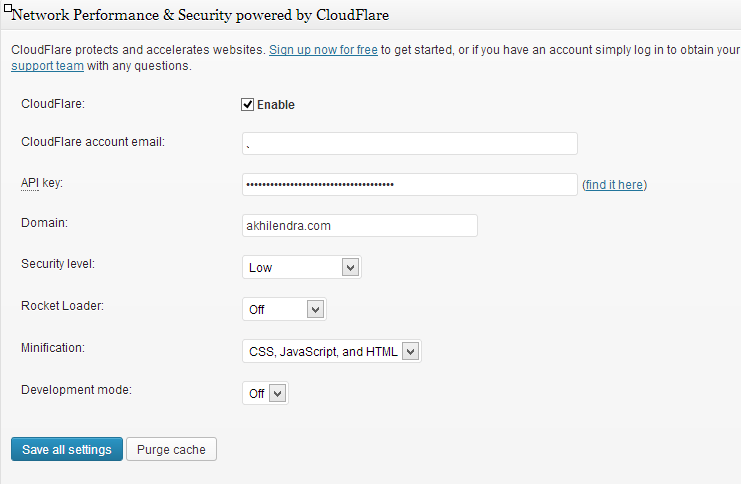
cloudflare settings in w3 total cache
With this, cloudflare is implemented in your wordpress blog.
W3 Total Cache Settings and installing MaxCDN
Step 1 – navigate to General Settings under Performance and click on Disable as shown in this image. It will activate the W3 Total Cache Plugin on your blog.
Step 2 – Enable Page Cache
Step 3 – Enable Browser Cache
Step 4– Enable CDN and select “NetDNA/MaxCDN” from the drop down menu in CDN Type.
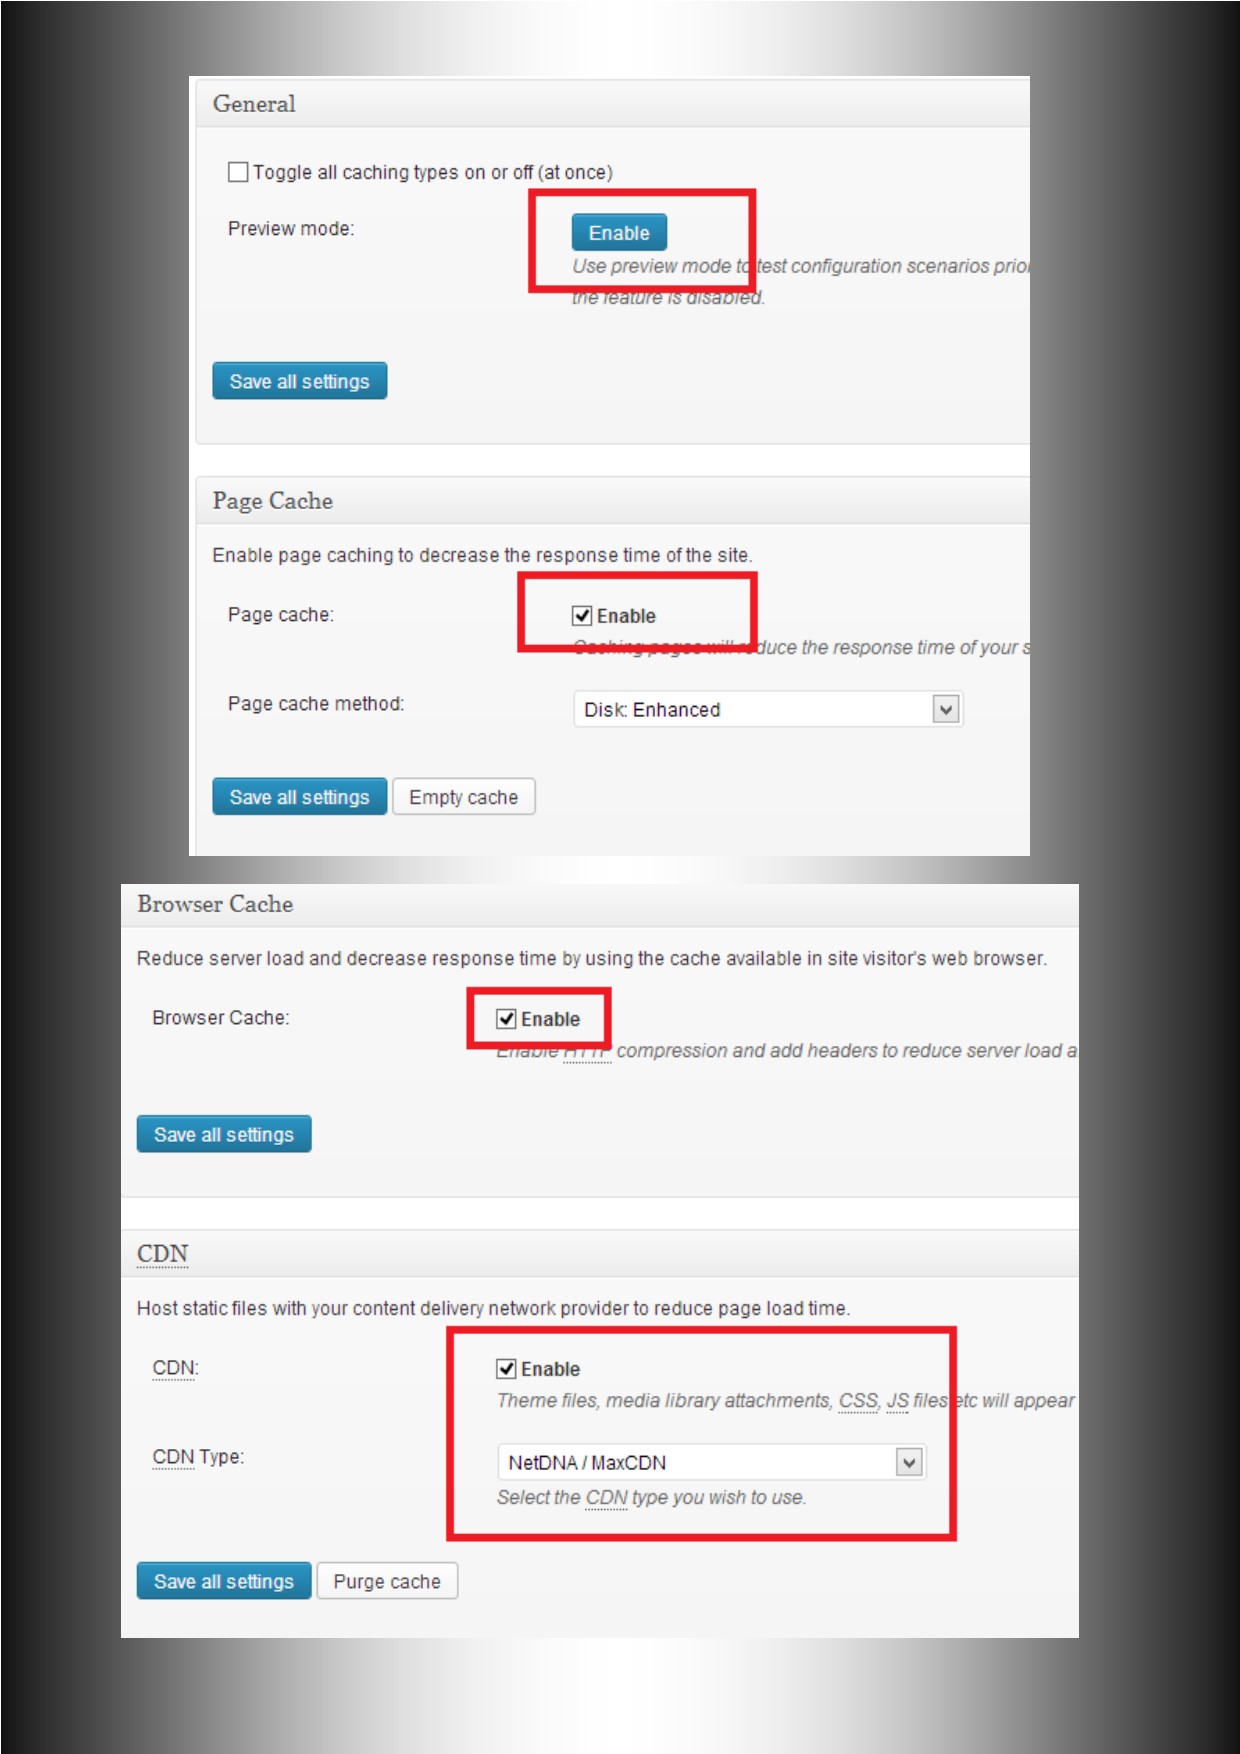
w3 total cache settings
Note – Don’t do anything in Minify, Database cache, object cache without getting confirmation from your hosts. Sometime, they crash your blog. So don’t enable these options.
Step 5– navigate to ‘CDN’ sub-menu option in “Performance”. You need to get your API details here. You can create API by either visiting your Maxcdn control panel or by clicking on “I have maxcdn”. You need to provide a alias name and description for your API.
Once you click on create, it will create an API for you with few details, you need following details out of all the details given in your API;
- Alias
- Consumer key
- Consumer secret
Now you need to enter configuration details in your W3 Total cache. Enter details as shown in the image and hit on save button.
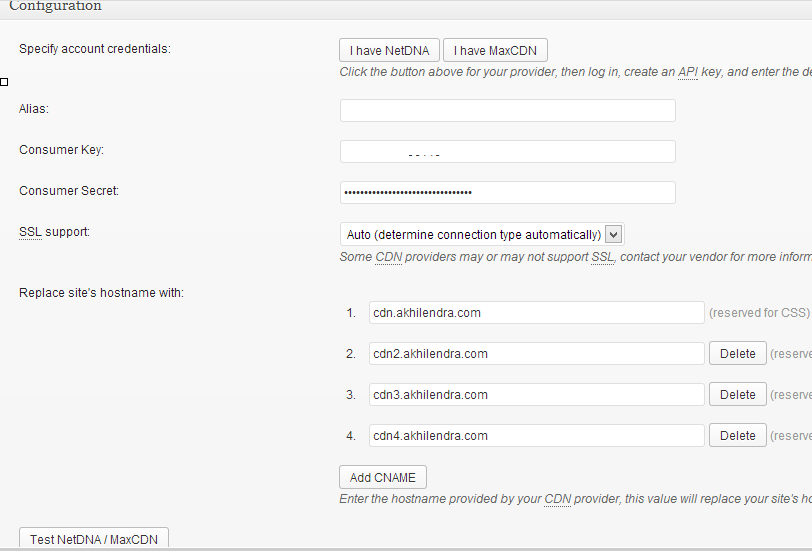
maxcdn settings in w3 total cache
Note– there is a bug in the latest version of w3 total cache and when you enter custom domain url (cdn.yourdomainname.com) and click on “Test NEtDNA/maxcdn” button, you will get a error message “Error: No zones matching custom domain”. Don’t bother about that as it won’t affect the working of maxcdn.
Step 6 – navigate to ‘Advance’ section below ‘configuration’ and check the check box for “Set cookie domain to yourdomainname” and Save settings.
If you have completed the steps as mentioned in this post, you have installed and setup maxcdn with w3 Total Cache.
Note – If you are using cloudflare with Maxcdn then don’t forget to enable “Strip All Cookies” option in Edge Settings under “Settings” in maxcdn admin dashboard. Also, contact maxcdn support to enable dynamic IP resolution. You need these two things done in order to successfully implement maxcdn with cloudflare.
Final Words
Now your maxcdn with cloudflare is implemented using W3 Total Cache Plugin. Enjoy awesome page speed for your blog or site. Maxcdn and cloudflare are very reliable and economical resources for bloggers and small businesses.
Page speed is vital to succeed in current world and if you have been ignoring that then you have been playing with your chances. I will recommend to use these services as MaxCDN is fairly economical with $30 (actual price $39 but with maxcdn discount coupon “akhilendramaxcdn“, it will be around $30) for first year mean under $3/month and Cloudflare is free. The benefits you get are huge therefore it worth putting such a minimal amount which can significantly improve your site’s prospects.
banglamovieonline.me">Farzana Neha - August 3, 2013 @ 12:39 pm
I have been trying MaxCDN from yesterday on my site. I had Asia zone enabled and I noticed traffics were not routing to Singapore (India and South East Asian Countries). So, I sent MaxCDN a ticked and they confirmed due to ISP issues MaxCDN doesn’t work in India. Ewww, that’s not good.
dzhingarov.com">Boris Dzhingarov - July 18, 2013 @ 2:00 pm
Hello,
I use MAXCDN, Cloud Flare with W-3 total cache. I would like to ask you why I need to add chames at my hosting provider when I already added them at cloudflare? My blog is still loading. Is ti wrong to add chames only in CloudFlare?
I also opened a topic here http://wordpress.org/support/topic/configuration-between-w3-total-cache-max-cdn-and-cloudflare-on-shared-hosting. I would appreciate answer.
Thanks.
https://akhilendra.com">akhilendra - July 18, 2013 @ 2:17 pm
when you talk about integrating cloudflare and maxcdn with wordpress, you have to update your cnames with your host also because those cnames are used by maxcdn to deliver content like static and dynamic files on your blog.
blogforweb.com">Boris Dzhingarov - July 18, 2013 @ 4:17 pm
Well but how about now when I added them only at CloudFlare. I mean my blogs are still loading. Am i going to see improvement if i add them at my host also?
blogforweb.com">Boris Dzhingarov - July 18, 2013 @ 4:31 pm
I just chat with MAXCD supprot. So They said that when you use CloudFLare with MAXCDN you should create chames only at CloudFlare. No need of chames at your host. You should create chames at your host if you don`t use CloudFlare. Please check:
“me: Hi
I use MAXCDN and CloudFlare together. I have created 4 custom domains. I added chames at CloudFlare. My blogs are loading. Check : http://dzhingarov.com/ My question is should I add chames at my hosting provider also?
Geno-Romualdo: I have checked your CNAMEs and its created properly
You don’t need to create a CNAME on your Host’s end now
me: What is the difference if I have chame only at CloudFlare and chames on CloudFlare and host?
Geno-Romualdo: There’s actually no difference at all, but you need to create a CNAME on your CLoudflare if in case you do use a Cloudflare
me: Ok I use CloudFlare
and MAXCDN with w-3 total cache
So in my case should I create chame in my host?
Geno-Romualdo: No, its better to create it on Cloudflare“
blogforweb.com">Boris Dzhingarov - July 18, 2013 @ 4:35 pm
Finally I found it here also http://support.netdna.com/howto/use-cdn-with-cloudflare/
https://akhilendra.com">akhilendra - July 18, 2013 @ 4:45 pm
Thanks a lot Boris for sharing these details with us, they not only helped me but also will help many other visitors. So as per this, you don’t need to create cnames with your host now.
blogforweb.com">Boris Dzhingarov - July 18, 2013 @ 4:55 pm
Thanks akhilendra for this conversation. Now I also learned this. Would you please check http://wordpress.org/support/topic/configuration-between-w3-total-cache-max-cdn-and-cloudflare-on-shared-hosting And share some information if you khow something more .
saywebhosting.com">Thejas Kamath - July 15, 2013 @ 12:46 pm
Thanks for an amazing guide. I’ve used MaxCDN, CloudFlare and W3 Total Cache together on my blog and it has worked great. My blog was loading in under a second.
techotips.com">Rajesh - March 25, 2013 @ 5:25 pm
Hi Akhilendra,
I am using CloudFlare + W3 cache plugin on one of my blogs and this combination has worked really great for me. It has helped me in reducing my blog load time by almost 50%. I will give MaxCDN a try. Thanks for the detailed article on CDN.